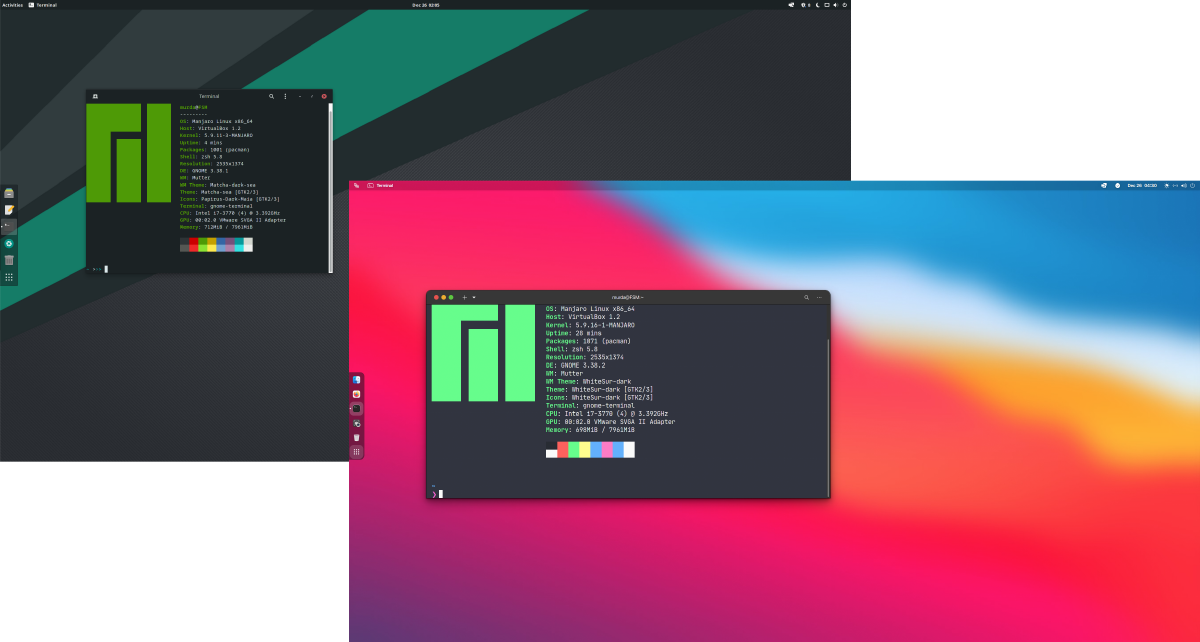
A few days ago, I wrote a tutorial on how to dualboot macOS and Linux on a Mac.
I expected a bunch of questions that I couldn’t possibly answer. Instead, I received a few questions on how I customized GNOME to look like macOS.
Even if the internet is full of tutorials on how to customize every DE available, I decided to write a tutorial on how I do it, slightly different from what is posted on the webz.
BEFORE WE GET STARTED:
- I chose a macOS theme because 1. I’m very familiar with macOS, and 2. I think it’s a clean look. You don’t have to agree, there are thousands of themes out there, and they can all be applied the same way ( more or less )
- You can do more, like install and theme/configure plank or latte dock, apply a theme to LightDM, etc. These things are beyond the scope of this tutorial.
- Speaking of a dock, I don’t use one. The dash to dock extension (pre-installed on Manjaro GNOME ) is enough for me. You can install the extension. More on that later.
- I’m using Manjaro GNOME, which comes with a lot of things pre-installed ( ex., some extensions that might not be available in other distros using GNOME DE )
- The same theme can be applied to XFCE and KDE. However, customization on XFCE is a bit more limited than GNOME, and KDE is all over the place, but you can take it further.
- Make sure you have
curlandgitinstalled
TERMINAL
Tweaking the terminal has nothing to do with making GNOME look like macOS Big Sur. However, I like to use the Z shell instead of bash.
So, right now, I like my terminal to look like this:

1. Installing Oh My Zsh
Oh My Zsh is a community-driven framework for managing your zsh configuration. Includes nearly 300 optional plugins, over 140 themes to spice up your morning, and an auto-update tool so that makes it easy to keep up with the latest updates from the community.
First of all check if zsh is installed on your machine with which zsh. It should return /usr/bin/zsh. If zsh is not available, install it from your distro’s official repo.
Next install Oh My Zsh with sh -c "$(curl -fsSL https://raw.github.com/ohmyzsh/ohmyzsh/master/tools/install.sh)"

2. This step is optional but nice to have. Install two Zsh plugins:
- zsh syntax highlighting with
git clone https://github.com/zsh-users/zsh-syntax-highlighting.git ${ZSH_CUSTOM:-~/.oh-my-zsh/custom}/plugins/zsh-syntax-highlighting - zsh autosuggestions with
git clone https://github.com/zsh-users/zsh-autosuggestions ${ZSH_CUSTOM:-~/.oh-my-zsh/custom}/plugins/zsh-autosuggestions

3. Installing Purify theme with curl https://raw.githubusercontent.com/kyoz/purify/master/zsh/purify.zsh-theme --output ~/.oh-my-zsh/themes/purify.zsh-theme
NOTE: purify is available for fish shell, many more terminal emulators, CLI file managers, etc. See the github page for more info. If you’re using Alacritty as your terminal emulator, you might be interested in this article on how to easily apply and change alacritty themes.

4. Enable the new theme and plugins. You will need to edit .zshrc ( you can use nano, vim, your favorite GUI text editor. whatever you want ). Change ZSH_THEME="purify" and add zsh-autosuggestions and zsh-syntax-highlighting to the plugins section.

Now you can either restart the terminal or run source ~/.zshrc to apply the changes. Also make zsh your default shell with chsh -s $(which zsh).

5. The terminal starts to look much better, but there’s still a few changes to be done. First let’s install the Purify terminal theme with curl -s https://raw.githubusercontent.com/kyoz/purify/master/gnome-terminal/purify.sh | zsh -s
Go to your terminal’s preferences and set Purify as the default theme. Also, choose your terminal window size. Restart the terminal.

5.1 Add some padding to the terminal. You can do this from the terminal or your favorite GUI file manager and text editor..
To add padding, you will need to navigate to ~/.config/gtk-3.0/ and create a file called gtk.css.
Open gtk.css and add these styles to it ( adjust to your liking ):
VteTerminal,
TerminalScreen,
vte-terminal {
  padding: 0px 0px 0px 16px;
  -VteTerminal-inner-border: 0px 0px 0px 16px;
}


5.2 Better fonts. First, open up pamac and enable the AUR repository.

Now search for jetbrains mono and install nerd-fonts-jetbrains-mono. Also install otf-sfmono 20180608-1 and otf-san-francisco 1:2-1 , as you will need them later.
NOTE: if you don’t use an Arch based distro, you can get jetbrains font here and Apple’s San Francisco font here. Copy them to /usr/share/fonts

Now back to your terminal, open up preferences and change the font to jetbrains mono nerd font.


5.3 One last bonus tip and we’re done with the terminal. Install exa – an improved file lister with more features and better defaults. It uses colours to distinguish file types and metadata. It knows about symlinks, extended attributes, and Git.
exa should be available in the official repositories. Once installed, edit .zshrc and alias ls to exa. In this example we’re going to use alias ls='exa -lah --group-directories-first --color=always'

APPLYING macOS THEME
1. In your home folder create two new folders. One called .themes and another one called .icons. NOTE: These folders will be hidden. Toggle hidden files visibility to see them.
2. Go to https://www.gnome-look.org/search/projectSearchText/whitesur

3. Download and extract WhiteSur Gtk Theme to the .themes folder and WhiteSur icon theme and WhiteSur cursors to the .icons folder.
NOTE: you will most probably get an error when trying to extract the icons theme. It will say the file is corrupt. If that’s the case, install the theme by cloning the GitHub repo.
To do that, open up the terminal and run :
- git clone https://github.com/vinceliuice/WhiteSur-icon-theme.git
- cd WhiteSur-icon-theme
- ./install.sh

4. Now let’s apply the theme and icons. With the latest release of Manjaro GNOME, Gnome Tweaks comes pre-installed. If you don’t have it installed, install it from the official repos.
Now open Gnome Tweaks, go to Appearance and choose the variant of the theme you’ve downloaded, as well as the WhiteSur icons and cursor.

Next go to Window Titlebars and set the Placement to Left.

Last step is to change the system fonts to the San Francisco font downloaded earlier. Go to Fonts and change Interface Text to SF Pro Display Regular and Monospace Text to SF Mono Regular.

We’re almost done, but there are a few more changes that I like to make. The first one would be tweaking the WhiteSur theme just a tiny bit.
I don’t know about you, but I don’t want the Apple logo as the Activities menu button. I also don’t want it to say Activities either. So I change it to the FSM logo or Tux.

To change the Apple logo, go to ~/.themes/WhiteSur-dark/gnome-shell/assets and replace the activities.svg with your own custom .svg image. NOTE: you can rename the original file to something like activities-bkp.svg, just in case you want to revert the changes.

EXTENSIONS
The latest release of Manjaro GNOME comes with a lot of useful extensions pre-installed. If you’re running any other GNOME distro, you should also install User Themes.
1. Visit https://extensions.gnome.org/
2. Install the browser extension

3. Now search and install Frippery Move Clock to move the clock from the middle of the menu bar to the right, and Panel OSD to configure the notifications window.

4. Open extensions applications and click on the gear icon next to Panel OSD to configure the notifications screen to your liking.

LAST STEP – FIREFOX
This step is not GNOME or even LINUX specific. You can apply this Firefox theme on macOS and Windows too.

1. Open Firefox and type about:config in the address bar. Accept the risks and then search for toolkit.legacyUserProfileCustomizations.stylesheets. Double click on the string to set it to true.

2. Close Firefox
3. Open Terminal and:
- git clone https://github.com/vinceliuice/WhiteSur-gtk-theme
- cd WhiteSur-gtk-theme/src/other/firefox

4. You’ll need to copy chrome folder to your Firefox profile folder.
How to find the path to your Firefox profile folder? Open Firefox and type about:support in the address bar.

5. Back in terminal, use cp -r chrome ~/.mozilla/firefox/your-firefox-profile-folder to copy chrome folder to your Firefox profile folder.
6. Restart Firefox
7. Open userChrome.css ( located in your Firefox profile folder/chrome ) with a text editor and follow instructions to enable extra features.

For troubleshooting check this page.
That’s pretty much it. I hope this tutorial helps, or at least give you a solid start in customizing your desktop.
UPDATE
Totally slipped my mind. As a replacement for Spotlight, I use Ulauncher. Works great and looks great. Reminds me of the old Quicksilver project on macOS.


