Creating virtual machines is fun. And there’s a lot of options to do it. Being VMWare, Parallels, VirtualBox or GNOME Boxes.
Linux users also have the option of using KVM/QEMU/libvirt and a GUI client like Virt-Manager.
We talked about KVM and QEMU before, when we went over how to install macOS on Linux.
So, today we’re taking a look at how to install and use KVM/QEMU/Virt-Manager to set up your virtual machines.
Why so many choices for the home user? Because having choices is always a good thing, and none of them are perfect.
VirtualBox is the most popular one. Many OS’ are even optimized for VirtualBox.
That being said, it’s not all fun and games when it comes to VirtualBox.
Even if you only have to install VirtualBox and VirtualBox guest-aditions to start creating your VMs ( and maybe the extension pack ), VirtualBox emulates hardware to feed to the guest OS.
While using the KVM/QEMU/Virt-Manager ( and libvert ) combo you’re almost running on bare metal making the experience much faster.
To understand why, let’s brake it down:
- KVM is a hypervisor built into the Linux kernel
- QEMU makes use of KVM to use CPU extensions for virtualization
- libvirt is collection of software that provides a convenient way to manage virtual machines and other virtualization functionality, such as storage and network interface management
- Virt-Manager is a GUI front-end for managing virtual machines through libvirt
What’s missing from the list above? The OS that stands between the hardware and the hypervisor (KVM).
You must be hyped by now. You’re probably thinking that you’re going to make a Windows VM and play some AAA games.
Well, not realy because 1. I’m not a gamer so I won’t cover this here 2. Gaming on Linux got way better from my understanding and 3. Most importantly, you’ll have to deal with PCI passthrough which I can’t help you with. At least not today.
That being said, at the end of the day, all of these are just tools. Depending on your usecase, use the one that fits your needs.
ALSO READ HOW TO: Create Disposable VMs in VirtualBox, GNOME Boxes and KVM/QEMU/Virt-Manager
INSTALLATION
First thing you need to do, is to check if your processor has virtualization support (named VT-x for Intel processors and AMD-V for AMD processors).
To do that, open up a terminal and run LC_ALL=C lscpu | grep Virtualization.

If nothing is displayed after running the command, then your processor does not support hardware virtualization, and you will not be able to use KVM.
If that’s the case, you probably need to enable virtualization support in your BIOS. All processors in the last 10 years or so support virtualization.
NOTE: The installation process is for an Arch-based distro. Please adjust the comments and possibly package names according to your distro/package manager.
1. Install requirements by running: sudo pacman -S qemu virt-manager ebtables
2. Enable the libvirtd daemon by running sudo systemctl enable --now libvirtd
3. Check if libvirtd daemon is enabled by running systemctl status libvirtd
4. Now you need to make your user part of the libvirtd group. You can do that by running sudo usermod -G libvirtd -a your_user
5. Reboot
USAGE
1. Now you should be ready to go. Open up Virt-Manager, and you will get a window similar to the one below

2. Assuming that you already have the desired .iso file downloaded, to create a new VM you can either go to File > New Virtual Machine or click on the first button below the menu bar ( the one that looks like CRT monitor lighting up ).
3. On the next screen you can choose how would you like to install the OS. Since, you’re reading this I’ll assume this is your first VM so you can leave it as default Local install media and click Forward.

4. Click Browse to choose the .iso

5. On the bottom right corner of the window click on Browse Local and look for the .iso you’ve downloaded

6. Virt-Manager should automatically detect the OS you’re installing.
If it won’t detect it, just uncheck Automatically detect from the installation media/source and look for your OS in the list.
NOTE: In this demo I’m installing EndevourOS. I won’t find EndevourOS in the list. However Endevour is Arch-based so I’ll choose Arch Linux.

7. On the next screen you can set the RAM and CPU

8. Now set how much space you want to allocate to the VM disk

9. You’ve arrived to the last screen. Here you see a summary of your VM, and if everything looks right, you can click finish to begin the installation.


9.1 If you pay attention to the summary screen, you also have the option to Customize configuration before install.
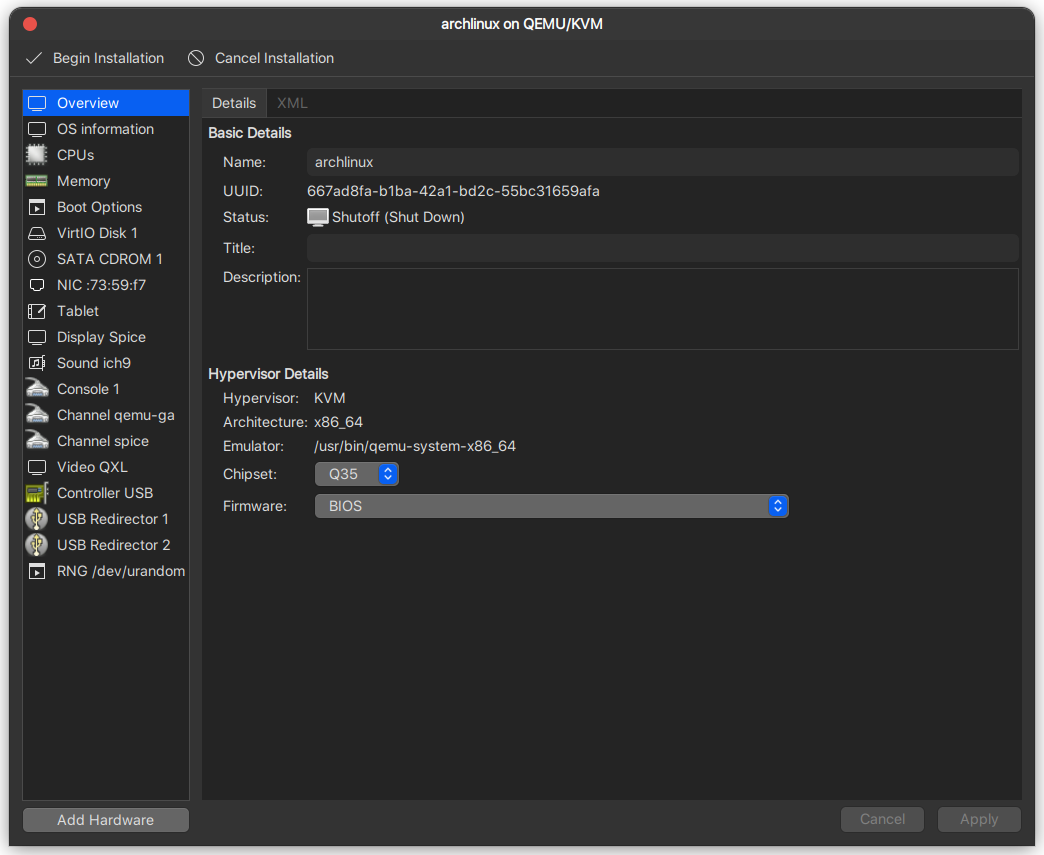
If you check that option and click Finish you’ll first get to the screen below where you can really fine tune everything and once you’re done you can click on Begin Installation to start the installation.

10. That’s it! Congrats. You’re running your first VM.
TROUBLESHOOTING, TIPS and TRICKS
I won’t go into great detail, however I’m going to cover some basic things here to help you out.
As I’ve said in the begining, no VM tool is perfect and it would be a shame to give up on KVM/QEMU/Virt-Manager for a few minor details.
Display Resolution – this is always a pet peeve of mine. No matter if it’s Virt-Manager or VirtualBox. Some OS’s look just right out of the box. Others need some tweaking.
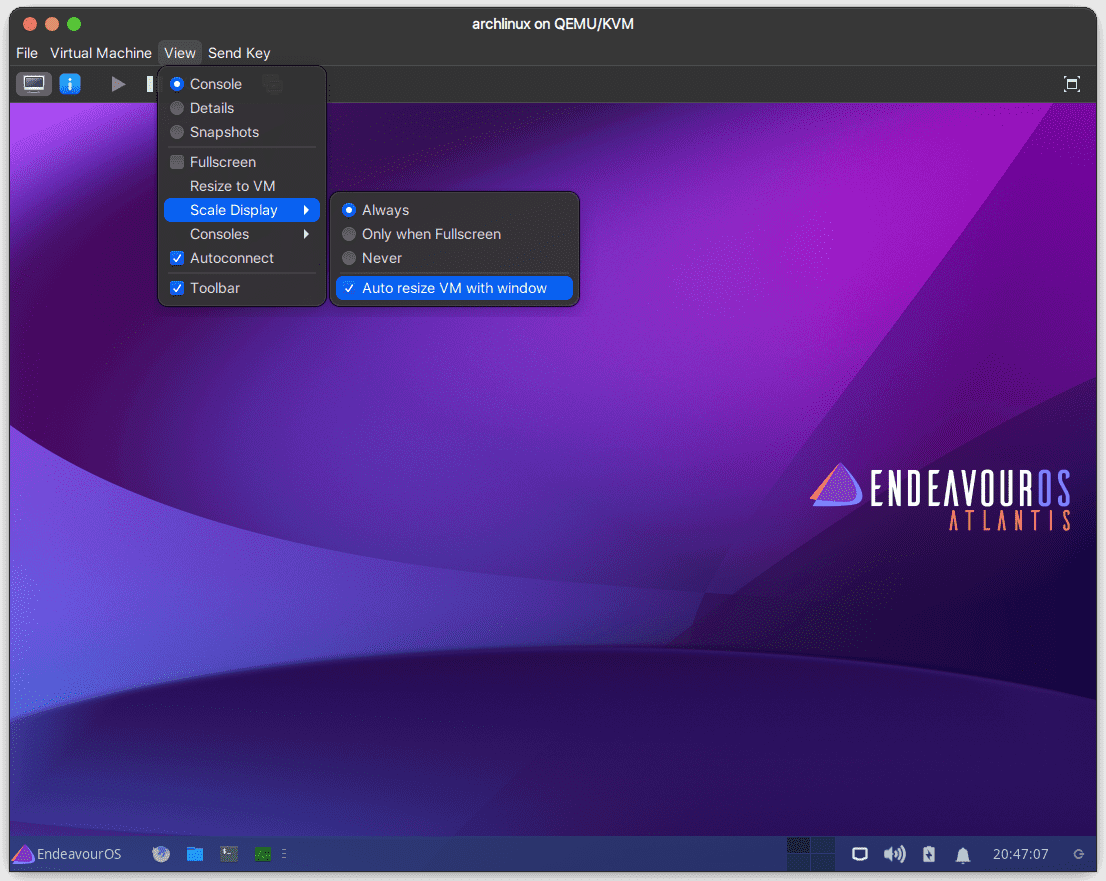
First make sure the display resolution is working. While the VM is running go to View > Scale Display > Auto resize VM with window.
Play around with the VM window see if it works.

If it doesen’t, you’ll need to install some packages. I’ve already covered this part in the GNOME Boxes article under the Tweaking section.
If that fails too, your last resort is either tp try combinations of Display Spice and Video QXL in the Virtual Hardware Details ( see #9.1 above ), or if you’re like me and you just don’t have the patience to do that:
- set VM screen to the desired size
- open up a terminal and run
xrandr --output Virtual-1 --auto. BAM, magic!
Sharing files between host and guest – copy-pasting text work both ways. But sharing files it’s a different kind of beast.
It can be misleading because you can drag and drop files from your host machine to your guest machine by dragging and dropping.
So you’d think it works the other way around too. Nope! For that you need to set a shared folder.
Let’s see how to do this ( btw, this is not hard but it should be a tutorial on its own )
1. On your host machine, create a folder. I’ll create mine on ~/Desktop and call it Share
2. On this folder you’ll need to set the read, write and execute permissions to “anybody”. You can do that with chmod 777 Share

3. Shut down the VM if it’s running
4. Go to View > Details to switch the view to detail hardware view

5. Click on Attach hardware > Filesystem and fill in the source path to the shared folder (/home/murda/Desktop/Share in my case) and virtual target path (This can be anything you like. Commonly /sharepoint is used)

6. Restart the VM.
7. When you’re back into the VM, cd to path > create a folder with the same name as on the host machine > and run sudo mount -t 9p -o trans=virtio /sharepoint Share to mount the folder

8. To have the shared folder automounted every time you start up the VM, you need to edit /etc/fstab and insert: /sharepoint /home/murda/Desktop/Share 9p trans=virtio,version=9p2000.L,rw 0 0
NOTE: change the path to the folder accordingly and those are not spaces. You hit Tab between arguments

9. WOW, that’s a lot. Doing it is so much faster though.
Passing USB devices to the guest
If you don’t want to do everything above, passing USB devices ( such as USB flash drives ) to the guest machine is super easy.
Plug in your USB device, go to Virtual Machine > Redirect USB device and choose the device from the list that pops up.


Converting VirtualBox VMs to use with Virt-Manager – Now everything so far is great, but you’ve got a lot of VMs inside your VirtualBox, and it’ll be a pain to do it all over inside Virt-Manager.
You can convert your existing VirtualBox VMs into .qcow2 VMs so you can import everything into Virt-Manager.
To do that, open up the terminal and:
1. cd into path (where the actual VirtualBox VM is located)
2.Run sudo qemu-img convert -f vdi -O qcow2 Endevour.vdi /var/lib/libvirt/images/Endevour.qcow2
NOTE: depending on the size of the VM and how beefy your computer is this process might take quite a while.

3. Now open up Virt-Manager, and basically you follow the above tutorial but, instead of choosing Local install media, you need to choose Import existing disk image. Next screen click on Browse and then choose the imported image.


4. Continue as normal.
That’s pretty much it. This is not a perfect solution, but in many aspects is far superior to other solutions like VirtualBox.
I’ll say it again: all of these are just tools. Use them as such.


